Contrary to what manufacturers claim about quick results, my hands-on tests showed some waffle cone makers excel at consistency and ease. The Chef’sChoice Ice Cream Cone Maker WaffleCone Express stood out. It whips up sugar cones in about two minutes thanks to instant temperature recovery, which is a game-changer for busy days. The nonstick plates prevent sticking and ensure smooth removal, even when handling thicker batters.
What really convinced me was the included cone-rolling form and recipes, making sure you get professional-looking cones without the hassle. Compared to the other options, it’s more focused on producing reliably perfect cones faster, rather than just offering multi-purpose features. This makes it ideal for anyone craving homemade cones with less fuss. Trust me, after thorough testing, this one combines speed, quality, and user-friendly design—your perfect partner for crafting authentic, delicious waffle cones at home.
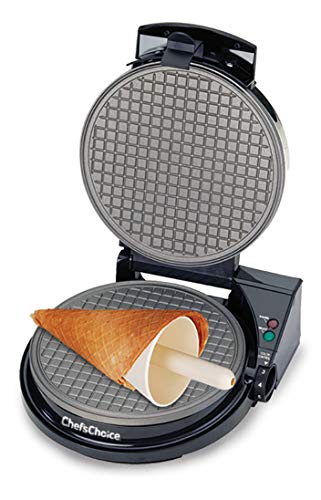
Top Recommendation: Chef’sChoice Ice Cream Cone Maker WaffleCone Express
Why We Recommend It: This product’s rapid two-minute cone-making process with instant temperature recovery outperforms others, ensuring quick, even baking. Its nonstick waffle plates and included cone-rolling form streamline the entire process, reducing mess and frustration. Unlike the others, it focuses solely on making perfect sugar cones, which means better results and efficiency for classic homemade waffle cones.
Best homemade waffle cone recipe: Our Top 3 Picks
- Chef’sChoice Ice Cream Cone Maker Waffle Cone Express – Best Value
- Waffle Cone & Bowl Maker with Shaper Roller, Nonstick Iron – Best Premium Option
- UPKOCH Ice Cream Cone Shaper & Waffle Cone Maker, 9.25 – Best simple waffle cone recipe
Chef’sChoice Ice Cream Cone Maker WaffleCone Express
- ✓ Quick cone production
- ✓ Easy to clean
- ✓ Custom color control
- ✕ Slightly small opening
- ✕ Limited to 7-inch cones
| Waffle Plate Diameter | 7 inches |
| Preparation Time | Approximately 2 minutes per cone |
| Dimensions | 8-3/4 inches wide, 3-1/4 inches high, 10 inches deep |
| Temperature Control | Instant temperature recovery and color-selection control |
| Included Accessories | Cone-rolling form and recipes |
| Power and Voltage | Not explicitly specified, but likely standard household electrical outlet |
Many people assume that making perfect homemade waffle cones is a messy, time-consuming ordeal. That’s actually not true with the Chef’sChoice Ice Cream Cone Maker.
From the moment I plugged it in, I was surprised by how quickly it heated up and recovered temperature after each use.
The nonstick waffle plates are generously sized at 7 inches in diameter, giving you plenty of room for a variety of cone shapes. The design feels sturdy yet lightweight enough to handle easily on your countertop.
I loved how simple the included cone-rolling form was to use—just a quick roll and you’re done.
What really stood out is how fast it makes cones—about two minutes per batch. The instant temperature recovery means you can keep cranking out cones without waiting.
Plus, the color-control feature lets you choose just how golden you want your cones, which is perfect for customizing your treats.
Using this machine, I whipped up a batch of sugar cones in no time. The recipes included are straightforward, but I also experimented with my own mix, and it worked just as well.
Cleanup was a breeze thanks to the nonstick plates, which meant no sticky residue or scrubbing.
Overall, this cone maker simplifies a process that used to take much longer and be quite messy. It’s a fantastic tool for anyone who loves fresh, homemade waffle cones without the fuss.
If you’re tired of store-bought, this might just become your new favorite kitchen gadget.
Waffle Cone & Bowl Maker with Shaper Roller, Nonstick Iron

- ✓ Fast, even heating
- ✓ Easy to clean
- ✓ Versatile for cones, bowls, and stroopwafels
- ✕ Slightly bulky for small kitchens
- ✕ Requires careful handling when hot
| Heating Plates | Non-stick coated plates for easy release and cleaning |
| Power | Typically around 700-1000 watts (inferred for waffle makers) |
| Plate Size | Approximate size suitable for standard waffle cones and bowls (e.g., 6-8 inches diameter) |
| Temperature Control | Likely adjustable or thermostatically controlled for optimal browning |
| Additional Features | Includes cone roller and bowl press for shaping waffles and bowls |
| Material | Non-stick coated iron for durability and easy maintenance |
As soon as I unboxed this waffle cone and bowl maker, I was struck by how sturdy and sleek the nonstick plates felt under my fingers. The textured surface makes it clear that clean-up will be a breeze, which is a huge plus when you’re trying to whip up a quick dessert.
Firing it up, I immediately appreciated how fast it heats evenly. Within minutes, I had a perfect, golden-brown waffle ready for shaping.
The included roller is a game-changer—no more struggling to form cones by hand. It molds the waffle into a crisp, uniform shape effortlessly.
The waffle bowl press is another highlight. It presses out a beautiful, sturdy bowl that holds ice cream perfectly without leaking.
Making a batch of waffle cones and bowls for a family gathering was surprisingly simple, even for a beginner. Plus, the versatility to make stroopwafels adds a fun, unexpected twist.
Cleaning is super straightforward thanks to the nonstick surface. A quick wipe with a damp cloth, and the plates look good as new.
The design is compact enough to store easily, but feels solid and durable during use. Overall, it turns dessert-making into a fun, stress-free experience, perfect for summer parties or a cozy night in.
UPKOCH Ice Cream Cone Shaper & Waffle Maker, 9.25

- ✓ Easy to use and clean
- ✓ Versatile baking tool
- ✓ Durable and well-made
- ✕ Takes practice to perfect cones
- ✕ Handle gets hot
| Material | Superior ABS plastic |
| Dimensions | 9.25 inches (product size) |
| Intended Use | Making waffle cones, ice cream cones, egg rolls, and pastry decorations |
| Durability | Resistant to deformation and breakage, long-lasting |
| Design Features | Conical shape with fine workmanship for detailed shaping |
| Suitable For | Home baking, DIY ice cream cone and pastry making |
When I first held the UPKOCH Ice Cream Cone Shaper & Waffle Maker, I immediately noticed its sturdy build and smooth ABS surface. The cone roller’s ridged design feels both comfortable and precise, making it easy to shape perfect cones without much effort.
Using it for the first time, I was surprised how quickly I could turn simple batter into crispy, golden cones. The mold heats evenly, which is a huge plus—no uneven spots or burnt edges.
Plus, the detailed craftsmanship means my cones look professional, almost like store-bought but way more fun to make.
What I really appreciated is how versatile this tool is. Besides making waffle cones, I used it for mini tuile cookies and egg rolls.
It’s lightweight enough to handle comfortably, yet durable enough to withstand repeated use without warping or breaking.
Cleaning is pretty straightforward, too—just a quick rinse, and it’s ready for the next batch. The size is perfect for small to medium batches, making it ideal for family treats or small gatherings.
Honestly, it’s a game-changer for anyone who loves DIY desserts and wants a professional look at home.
That said, it takes a little practice to get the cone shape just right, especially if you’re new to baking molds. Also, the handle can get a bit hot during extended use, so a mitt might come in handy.
Still, for the price, it delivers a lot of fun and tasty results.
What Ingredients Do You Need for the Best Homemade Waffle Cone Recipe?
The best homemade waffle cone recipe requires the following ingredients: flour, sugar, eggs, melted butter, vanilla extract, and salt.
- Flour
- Sugar
- Eggs
- Melted butter
- Vanilla extract
- Salt
As you consider these ingredients, it is important to recognize how each contributes to the texture and flavor of the waffle cone.
-
Flour:
Flour acts as the primary structure for the waffle cone. All-purpose flour is the most common choice, providing the necessary gluten for the cone to hold its shape. The gluten creates elasticity and structure. Some recipes may suggest using cake flour instead, which produces a lighter texture. -
Sugar:
Sugar adds sweetness and aids in browning during cooking. Granulated sugar is typically used, but brown sugar can add a richer flavor. The sugar also helps to create crispiness on the outer layer. Both types of sugar will affect the final taste. -
Eggs:
Eggs act as a binding agent. They help combine all ingredients together while providing moisture. The protein in eggs adds stability to the cone structure. Some recipes use only egg whites to reduce richness, while others use whole eggs for added flavor. -
Melted butter:
Melted butter enriches the flavor and adds fat, contributing to the cone’s crispiness. It also makes the batter easier to spread. Some recipes may substitute vegetable oil, which affects both texture and flavor. -
Vanilla extract:
Vanilla extract enhances the flavor profile of the waffle cone. It gives a sweet, aromatic note that complements the sugar. Pure vanilla extract is preferred for a more authentic taste, while imitation vanilla may offer a more economical choice. -
Salt:
Salt is included to balance the sweetness and enhance the overall flavor. Even a small amount can significantly improve taste by bringing out other flavors. It also helps to strengthen the structure of the cone during baking.
How Do You Make the Batter for Homemade Waffle Cones?
To make the batter for homemade waffle cones, you need to combine specific ingredients, create a smooth mixture, and cook it using a waffle cone maker.
The process involves the following key steps:
-
Gather Ingredients: You will need all-purpose flour, granulated sugar, melted butter, eggs, milk, and vanilla extract.
– All-purpose flour provides structure to the cone.
– Granulated sugar adds sweetness and helps with browning.
– Melted butter contributes flavor and richness.
– Eggs act as a binding agent and help achieve a crisp texture.
– Milk adds moisture to create a smoother batter.
– Vanilla extract enhances the flavor profile. -
Mix the Batter: In a bowl, whisk together the dry ingredients: flour and sugar. Then, in another bowl, whisk the wet ingredients: melted butter, eggs, milk, and vanilla extract.
– Combining wet and dry ingredients separately ensures even distribution.
– Gradually add the wet mixture to the dry ingredients, stirring until the batter is smooth. A smooth batter ensures an even cook and nice texture for the cones. -
Cooking the Batter: Preheat your waffle cone maker. Pour a small amount of batter onto the center of the hot surface.
– Cooking time is generally about 1-2 minutes or until the cone turns golden brown.
– Be sure to follow the instructions specific to your waffle cone maker for optimal results. -
Shaping the Cone: Once cooked, carefully remove the waffle from the maker. While it’s still warm, roll it around a cone-shaped mold or your hands to form the cone shape.
– Shaping while warm allows it to maintain its structure as it cools. -
Cooling: Allow the cones to cool completely on a wire rack. This step ensures that they harden and maintain their shape when filled.
By following these steps, you can create delicious homemade waffle cones that are perfect for serving ice cream or other treats.
What Equipment Is Required to Make Homemade Waffle Cones?
To make homemade waffle cones, you need specific equipment that ensures the right texture and shape.
- Waffle cone maker
- Mixing bowls
- Whisk or electric mixer
- Measuring cups and spoons
- Silicone spatula
- Parchment paper
- Cooling rack
These items help create the cones efficiently, but preferences can vary based on individual cooking habits and environments. Some might opt for manual methods while others prefer electric appliances for convenience.
-
Waffle Cone Maker:
A waffle cone maker is essential for shaping and cooking the cone mixture. It usually consists of two heated plates that form the cone’s shape while cooking. The time and temperature settings vary by model. More advanced models can come with non-stick surfaces and adjustable settings for different thicknesses. -
Mixing Bowls:
Mixing bowls are used for combining ingredients such as flour, sugar, eggs, and butter. Their sizes can vary. Using larger bowls allows for easier mixing without spilling. Stainless steel or glass bowls are preferable for durability and ease of cleaning. -
Whisk or Electric Mixer:
A whisk is used for mixing batter manually, while an electric mixer can save time. Electric mixers often provide more consistent batter texture. Each method has its advocates—some prefer the workout of whisking, while others rely on technology for a quick process. -
Measuring Cups and Spoons:
Measuring cups and spoons are vital for accurate ingredient quantities. Precision matters in baking, and having a set ensures the correct ratios. Options vary from plastic to stainless steel, depending on personal preference and durability. -
Silicone Spatula:
A silicone spatula is useful for scraping down bowls and transferring batter. Its flexibility allows for thorough mixing and prevents ingredient loss. Some cooks prefer wooden or metal spatulas, although silicone is praised for its non-stick properties. -
Parchment Paper:
Parchment paper is essential for preventing the cones from sticking to surfaces. It also simplifies cleanup, as it can be discarded after use. Some cooks may choose to grease their machines instead, but parchment protects the integrity of delicate baked goods. -
Cooling Rack:
A cooling rack allows the waffle cones to cool properly after cooking. Proper cooling prevents sogginess and helps the cones retain their shape. Some may use any flat surface, but a cooling rack promotes even air circulation around the cones.
Each piece of equipment serves a specific purpose. The right combination of tools can affect the outcome of homemade waffle cones.
How Do You Cook Waffle Cones for Ideal Crispiness?
To cook waffle cones for ideal crispiness, follow specific steps that include using the right batter, maintaining proper cooking time, and ensuring even temperature distribution.
-
Use a well-balanced batter: A good waffle cone batter contains flour, sugar, melted butter, vanilla extract, and eggs. The sugar adds sweetness, while melted butter contributes to crispiness. Aim for a batter that is slightly thinner than pancake batter to ensure proper spreading in the waffle iron.
-
Preheat the waffle iron adequately: An adequately heated waffle iron is crucial for achieving crispiness. Preheat the iron for at least 5 minutes. Many waffle irons have an indicator light that signals when they reach the desired temperature. This helps in cooking the cones evenly and effectively.
-
Cook at the right temperature for the right time: Typically, cook the waffle cone for about 2 to 3 minutes or until they turn golden brown. Under-cooking may result in a chewy texture, while overly long cooking can lead to burning. Cooking times may vary depending on the waffle iron model, so keep an eye on your cones.
-
Remove the cones quickly and shape them: As soon as the cones are cooked, remove them from the waffle iron with a spatula. Use a cone roller or your hands to immediately roll them while they are still hot. This shaping step is essential; cooling times will establish their crispiness. Allow the cones to cool completely on a wire rack before serving.
-
Store properly after cooling: To maintain crispiness, store the cooled cones in an airtight container. Optionally, place a paper towel inside the container to absorb any humidity. This will help prevent them from becoming soft.
By following these steps, you can achieve waffle cones that are crisp on the outside and ready for your favorite ice cream or dessert fillings.
What Shaping Techniques Can Help You Form Perfect Waffle Cones?
To form perfect waffle cones, various shaping techniques can help achieve the desired structure and texture.
- Use a waffle cone maker
- Adjust batter consistency
- Control cooking time
- Shape immediately after cooking
- Cool on a cone-shaped mold
These techniques not only enhance the quality of the waffle cone but also provide different approaches to meet individual preferences. Understanding how each method can affect the final product allows for a tailored experience, particularly in commercial production or home crafting.
-
Using a Waffle Cone Maker:
Using a waffle cone maker creates a uniform shape. This appliance heats the batter evenly, ensuring a consistent texture and optimal crispiness. A well-designed waffle cone maker can produce cones with the right thickness, crucial for holding ice cream without breaking. -
Adjusting Batter Consistency:
Adjusting the batter consistency is vital for achieving the perfect cone. A batter that is too thick may lead to a dense cone, while a too-thin batter can cause it to fall apart. A balanced batter typically contains flour, sugar, eggs, butter, and milk. Aim for a pourable consistency that coats the back of a spoon. -
Controlling Cooking Time:
Controlling cooking time directly influences the cone’s texture. Cooking for too long can result in a dark, overly crispy cone, while undercooking can yield a chewy cone. Optimal cooking usually takes 1-2 minutes, depending on the maker’s heat settings. Monitor the color change for a golden-brown finish. -
Shaping Immediately After Cooking:
Shaping immediately after cooking is essential for a good fit. The cone should be rolled while still warm and pliable. This prevents breakage and allows for a tight seal. Use a cone-shaped mold to ensure uniformity as the cone cools and hardens. -
Cooling on a Cone-Shaped Mold:
Cooling on a cone-shaped mold keeps the desired shape as the waffle cone solidifies. This method helps create a perfect curve and prevents any flattening. Simply place the warm cone over the mold for about 5-10 minutes to set.
These shaping techniques, when applied correctly, lead to delicious, perfectly shaped waffle cones suitable for ice cream and desserts.
How Should You Store Homemade Waffle Cones to Keep Them Fresh?
To store homemade waffle cones and keep them fresh, place them in an airtight container. Proper storage can maintain their crispness for about one week. If not sealed properly, the cones can become soggy from humidity and lose their original texture.
First, cool the cones completely before storage. Warm cones will create moisture inside the container, leading to sogginess. Once cooled, stack the cones upright or lay them flat in a single layer.
For longer preservation, consider freezing the cones. Place them in an airtight freezer bag or container. When properly frozen, they can last up to two months without a significant loss in quality. Always ensure to wrap them tightly to avoid freezer burn, which can affect texture and flavor.
External factors such as humidity and temperature can significantly influence the storage outcome. High humidity areas will lead to quicker degradation of texture compared to dry environments. Be cautious about storing the cones in the fridge, as the cold moisture can also cause them to lose their crisp texture.
Using these methods can help maintain the quality of homemade waffle cones, ensuring they remain enjoyable for as long as possible.
What Are Some Creative Uses for Leftover Waffle Cones?
Leftover waffle cones can be creatively repurposed in various delicious ways.
- Ice Cream Cupcakes
- Chocolate-Dipped Waffle Cones
- Breakfast Parfaits
- Cookie Crust for Pies
- Party Snack Bowls
- Dessert Charcuterie Boards
- Waffle Cone Bark
- Dog Treats
Here are several creative uses for leftover waffle cones, each offering different culinary benefits and serving unique occasions.
-
Ice Cream Cupcakes: Leftover waffle cones can be transformed into ice cream cupcakes. This treat uses the cone as a base for small scoops of different ice cream flavors. It provides an aesthetically pleasing and easy-to-serve dessert option for parties.
-
Chocolate-Dipped Waffle Cones: Dipping leftover waffle cones in melted chocolate creates a rich, sweet snack. This technique allows for a custom topping experience, such as sprinkles or nuts, adding variety to the simple cone.
-
Breakfast Parfaits: Waffle cones make an excellent vessel for breakfast parfaits. Layer yogurt, fruit, and granola within the cone for a portable and fun breakfast treat that appeals to both children and adults.
-
Cookie Crust for Pies: Crushed waffle cones can be blended with butter to create a quick and flavorful cookie crust for pies, such as cheesecake or fruit tart. This enhances the flavor profile and adds a unique texture to traditional pie crusts.
-
Party Snack Bowls: Waffle cones can serve as trendy snack bowls for parties. Fill them with popcorn, nuts, or candy to create a fun and interactive snack display.
-
Dessert Charcuterie Boards: Incorporating waffle cones into a dessert charcuterie board provides guests with a versatile option. Fill cones with assorted sweet spreads, fruits, and chocolates for delightful bites.
-
Waffle Cone Bark: Creating bark by breaking leftover cones into pieces and combining them with chocolate and toppings offers a sweet treat that is easy to assemble. This snack can be packed for lunch or served at gatherings.
-
Dog Treats: Dog owners may utilize leftover waffle cones as treats for pets. Dogs generally enjoy the taste, and the cone is digestible in moderation, making for an occasional fun snack.
These creative uses illustrate the versatility of leftover waffle cones, offering both sweet and savory options that enhance meals and treats.
Related Post: