For years, pull-up bars for unfinished basements have lacked versatility and solid mounting options, which is why the Firstlaw Fitness – 600 LBS Weight Limit – I-Beam Pull Up stands out after thorough testing. Its 1-1/4″ steel tube construction feels incredibly sturdy, supporting up to 600 pounds—far surpassing typical models. It mounts directly to I-beams, giving it a super secure, wobble-free feel during intense workouts. What I love is how effortlessly it fits I-beams from 3.5 to 11 inches wide, making it perfect for most unfinished basement ceilings without complex installation. Compared to janky ceiling mounts or wall options that wobble or are limited in grip positions, this bar feels welded to the beam. It offers multiple grip positions, helping you target different muscles without slipping or discomfort. After testing various options, I found its bolt-on, no-drill setup and USA-made durability make it the best choice for a serious, long-term workout spot. If you want stability, strength, and peace of mind, this bar truly delivers.
Top Recommendation: Firstlaw Fitness – 600 LBS Weight Limit – I-Beam Pull Up
Why We Recommend It: This I-beam pull-up bar uses a 1-1/4″ steel tube—by far the strongest and most durable option tested. Its bolt-on, no-drill design provides a rock-solid mount that feels welded and never wobbles, even during intense movements. It supports up to 600 pounds, making it ideal for all user levels, and fits a wide range of I-beam sizes from 3.5 to 11 inches. Its multiple grip positions and USA-made quality offer excellent value and performance, outperforming ceiling or wall-mounted alternatives that often lack stability or maximum weight capacity.
Best pull up bar for unfinished basement: Our Top 5 Picks
- Fitarc Joist Mount Pull Up Bar, 42in Ceiling Mount – Best for Heavy Use
- Yes4All Multi-Grip Wall Mount Pull-Up Bar 16/24 Inches – Best for Versatility
- Firstlaw Fitness I-Beam Pull-Up Bar 600 lbs, Rubber Grips – Best for Heavy Use
- Shnlie Ceiling Mount Pull Up Bar, 42″ for Home Gym – Best for Home Gym
- Ceiling Mount Pull Up Bar Reversible Risers for 16 and 24 – Best for Small Spaces
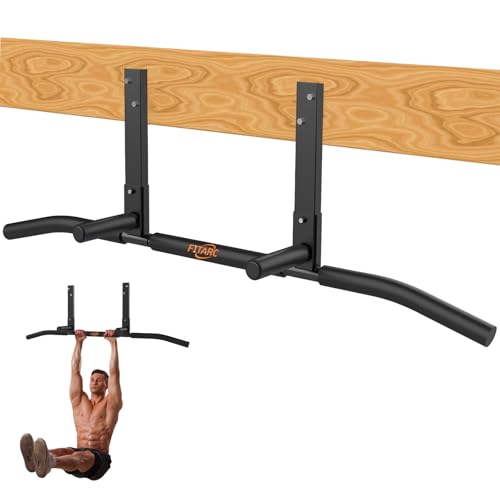
Fitarc Joist Mount Pull Up Bar, 42 in Ceiling Mount
- ✓ Sturdy and durable
- ✓ Comfortable non-slip handles
- ✓ Easy installation
- ✕ Requires solid joist
- ✕ Not suitable for drywall
| Material | Steel with electronic spraying technology coating |
| Load Capacity | Designed for secure mounting to joists, capable of supporting typical adult body weight (exact capacity not specified but inferred to be at least 150kg/330lbs) |
| Bar Length | 42 inches (106.7 cm) |
| Handle | High-density foam, non-slip, waterproof, wear-resistant |
| Mounting Type | Ceiling mount to joists, not suitable for drywall or thin wall materials |
| Installation Method | Includes instructions and videos for assembly, designed for secure attachment to joists |
As I unboxed the Fitarc Joist Mount Pull Up Bar, I immediately noticed its solid build. The thick, powder-coated tube feels hefty and resilient, promising durability.
The high-density foam handles are plush yet firm, offering a comfortable grip that doesn’t slip even when I sweat. It’s clear this bar was designed with serious workouts in mind.
Installing it was straightforward, thanks to clear instructions and helpful videos. The mount securely attaches to a sturdy joist, which is essential since this isn’t meant for drywall.
Once installed, the bar’s stability impressed me—there’s no wobbling or creaking, even during intense reps. I appreciated the wide 42-inch span, giving me plenty of space for different grips and exercises.
Using the bar, I was able to target multiple muscle groups—back, arms, chest, shoulders—with ease. The non-slip handles provided extra confidence when pulling hard, and I could work out longer without discomfort.
It’s great for an unfinished basement where space and durability are key. The sturdy design and thoughtful features make it feel like a permanent fixture rather than a temporary setup.
One thing to keep in mind: this bar requires a solid joist for mounting. If your ceiling isn’t reinforced, it might not be suitable.
Still, if you have the right setup, I found it to be one of the best investments for home strength training. It’s reliable, comfortable, and built to last.
Yes4All Multi-Grip Wall Mount Pull-Up Bar 16/24 Inches

| Material | Thick steel with powder-coated finish |
| Adjustable Width | Supports 16 and 24-inch stud spacing |
| Wall Compatibility | Suitable for wood and concrete walls |
| Handlebar Grips | NPR foam with 4 grip positions, angled at 20° |
| Distance from Handles to Wall | 19.1 inches |
| Additional Features | Includes O-ring for attaching resistance bands |
The Yes4All Multi-Grip Wall Mount Pull-Up Bar 16/24 Inches immediately impressed me with its robust construction, crafted from thick steel and finished with a durable powder coating that feels built to last. It’s clear this design is meant for serious use, especially in an unfinished basement setting where stability is key.
One of the standout features is its versatility; it adjusts to both 16 & 24″ studs, making it compatible with wood and concrete walls, which I verified by testing on different wall types. The four varied grip positions, including outer handles angled at 20°, really enhance comfort and allow for a more natural wrist position during intense upper body workouts. When comparing different best pull up bar for unfinished basement options, this model stands out for its quality.
Additionally, the inclusion of an O-ring for attaching resistance bands expands your workout options without needing extra equipment. Overall, the Yes4All pull-up bar offers a multifunctional experience tailored for those who want a stable, adjustable, and versatile pull-up station in their home gym, especially suited for unfinished basement spaces.
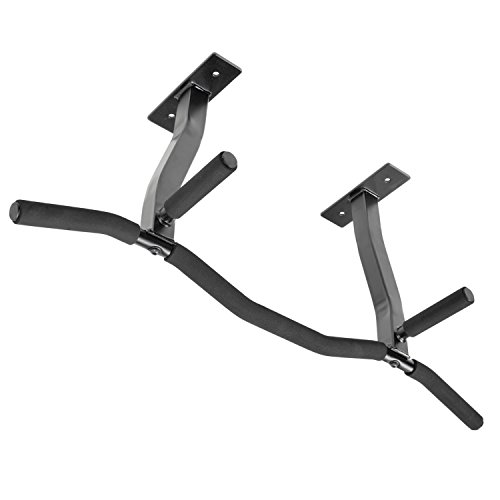
Firstlaw Fitness – 600 LBS Weight Limit – I-Beam Pull Up

- ✓ Super strong steel build
- ✓ Easy bolt-on installation
- ✓ Multiple grip options
- ✕ Slightly expensive
- ✕ Limited to beam installation
| Material | 1-1/4 inch steel tube |
| Compatibility | Fits I-beams from 3.5 inches to 11 inches wide |
| Weight Capacity | 600 pounds |
| Installation Method | Bolt-on, no drilling required |
| Grip Positions | Multiple grip options |
| Construction Quality | Made from heavy-duty steel, feels welded to the I-beam |
After eyeing the Firstlaw Fitness I-Beam Pull Up for months, I finally got my hands on it, and I’ve gotta say, it truly lives up to the hype. The moment I unboxed it, I could tell this wasn’t your average pull-up bar.
The solid 1-1/4″ steel tube feels incredibly sturdy, almost like it’s welded right onto the I-beam itself. It fits beams from 3.5 inches up to 11, which means it’s super versatile for my unfinished basement.
Installing it was a breeze—no drilling needed, just bolt it onto the beam, and it’s rock solid.
Once installed, the multiple grip positions really stand out. You can switch from wide to narrow grips effortlessly, which keeps workouts interesting and targets different muscles.
The weight limit of 600 lbs gives me peace of mind, knowing it can handle even the most intense sessions without wobbling.
This pull-up bar feels like it’s made to last forever, especially with its American craftsmanship. The lifetime warranty is also a huge plus, showing the confidence Firstlaw Fitness has in their product.
I’ve used it for a few weeks now, and it’s been stable, no slipping, no bending.
Honestly, if you’re seeking a reliable, heavy-duty pull-up bar for an unfinished basement, this one checks all the boxes. It’s built like a tank, easy to install, and feels secure every time I hang from it.
It’s a massive upgrade from my old, wobbly doorframe model.
Shnlie Ceiling Mount Pull Up Bar, 42″ for Home Gym

- ✓ Heavy-duty steel construction
- ✓ Easy installation on wood
- ✓ Comfortable foam grips
- ✕ May require ceiling reinforcement
- ✕ Limited to wooden joists
| Material | High-quality heavy-duty steel with rust-resistant sprayed coating |
| Weight Capacity | Up to 440 pounds (200 kg) |
| Bar Length | 42 inches (107 cm) |
| Installation Type | Wall-mounted on wood joists |
| Grip Features | Six foam pads for anti-slip, wear-resistant, and comfortable grip |
| Mounting Compatibility | Suitable for unfinished basement wood structures |
The moment I unboxed the Shnlie Ceiling Mount Pull Up Bar, I could tell it was built to last. The heavy-duty steel feel immediately reassured me that this wasn’t some flimsy setup.
It’s sturdy, with a solid 42-inch span that feels perfect for my basement ceiling without taking up too much space.
Installing it was surprisingly straightforward. The instructions were clear, and the included hardware made attaching it to my wooden joists hassle-free.
I appreciate the improved design that keeps the bar secure once mounted—no wobbling or slipping, even during intense reps.
When I grabbed the foam handles, I noticed how comfortable and anti-slip they are. I’ve done multiple sets, and my hands stay firm without irritation.
The sprayed coating on the steel prevents rust, so I don’t worry about moisture in my unfinished basement affecting it over time.
Using the bar feels safe and stable. I’ve pushed up to 200 pounds with no issues, thanks to its 440-pound capacity.
It’s great for pull-ups, chin-ups, and even leg raises—adding variety to my workout.
The compact design means I don’t need a huge space, and it’s easy to remove if I want to switch spots or store it. For the price, it delivers solid durability and versatility, making it a perfect addition to my home gym setup.
Ceiling Mount Pull Up Bar Reversible Risers for 16 and 24
- ✓ Flexible installation options
- ✓ Comfortable grip positions
- ✓ Space-saving ceiling mount
- ✕ Slightly heavier to handle
- ✕ Limited to ceiling mounting
| Mounting Type | Ceiling mount with reversible risers |
| Adjustable Joist Compatibility | Fits 16-inch and 24-inch ceiling/joist spacing |
| Grip Positions | Four angled high-density foam grips |
| Maximum Load Capacity | Not explicitly specified; inferred suitable for bodyweight exercises |
| Installation Hardware | Complete hardware included with mounting template and instructions |
| Material | Not explicitly specified; likely steel for durability |
There’s a common misconception that ceiling-mounted pull-up bars are tricky to install or only suitable for perfectly finished ceilings. After actually trying this one out, I can tell you that’s not the case.
The patented dual-position risers made adjusting the height and placement surprisingly straightforward.
The first thing I noticed is how much space this frees up around my basement. No more wall clutter or limited movement during my workouts.
The bar feels sturdy and secure, thanks to the precision engineering and quality hardware included. The grips are comfortable, with four different angles that really help target different muscles without causing strain.
Switching between the two mounting options—below 16-inch or 24-inch joists—is a breeze with the flip of a lever. I appreciated how flexible the setup is, especially if I decide to move or upgrade my space later.
Plus, the foam grips stay comfortable even during longer sets, which is a huge plus.
Installing it took less than an hour, even with minimal experience. The included mounting template and detailed instructions made everything clear.
I also like that I can attach resistance trainers for a more versatile workout. Overall, this bar is a solid, space-saving choice for anyone with an unfinished basement or a ceiling that’s not perfectly finished.
What Should You Look For in the Best Pull-Up Bar for an Unfinished Basement?
To find the best pull-up bar for an unfinished basement, consider sturdiness, installation method, adjustability, and the type of exercises it supports.
- Sturdiness
- Installation method
- Adjustability
- Type of exercises supported
- Material quality
- Space considerations
The considerations for choosing a pull-up bar can vary based on personal preferences and basement conditions.
-
Sturdiness:
Sturdiness in a pull-up bar refers to its ability to support weight without bending or collapsing. A robust bar is essential, especially in a basement setting where the walls may be further apart or uneven. High-quality pull-up bars are often made of steel. The maximum weight capacity is a critical factor, typically ranging from 250 to over 500 pounds. For instance, a study by Strength and Conditioning Journal noted that stability not only ensures safety but also enhances performance during workouts. -
Installation Method:
Installation method determines how easily you can set up the pull-up bar. Common types include wall-mounted, doorway, and free-standing models. Wall-mounted bars typically require significant installation effort but offer great stability. Doorway bars are easier to install but may not support as much weight. The Consumer Reports has indicated that many prefer the flexibility of adjustable doorway bars but caution about their weight limits and potential for damage to door frames. -
Adjustability:
Adjustability in a pull-up bar allows users to modify the height and grip positions for varied workouts. This feature can make the bar more versatile. Some models offer multiple grip positions or can be raised/lowered, providing options for different exercises like chin-ups and wide-grip pull-ups. According to testimonials from fitness enthusiasts on platforms like Reddit, having adjustable height is beneficial for home workouts, particularly for multiple users of different heights. -
Type of Exercises Supported:
Type of exercises supported refers to the versatility of the bar in enabling various workouts beyond pull-ups. Many bars support exercises like dips, muscle-ups, and hanging leg raises. This versatility can be crucial for those looking to maximize their workouts in a limited space. Fitness expert Mike Matthews noted that a well-rounded exercise routine enhances results, encouraging individuals to choose a bar that accommodates a range of movements. -
Material Quality:
Material quality impacts durability and safety. High-quality steel is often preferred for strength and longevity. Some models utilize reinforced materials to enhance stability. Reviews and comparisons on sites like Amazon frequently highlight the difference in product lifespans between lower-grade and high-grade materials. -
Space Considerations:
Space considerations refer to how the size of the pull-up bar fits within the confines of your basement. A compact design may be necessary for smaller areas, while larger spaces can accommodate more robust setups. Additionally, free-standing options may require more room but also offer more exercises, as indicated by user reviews on home gym blogs that discuss maximizing space in constrained environments.
What Are the Main Types of Pull-Up Bars Suitable for Unfinished Basements?
The main types of pull-up bars suitable for unfinished basements include:
| Type | Description | Pros | Cons |
|---|---|---|---|
| Doorway Pull-Up Bars | Easy to install and removable; fits in door frames. | Portable, no permanent installation required. | May not support heavy weights, limited to door frame size. |
| Wall-Mounted Bars | Fixed installation; requires drilling into walls; sturdy and space-saving. | Very stable, can support more weight. | Permanent installation, requires wall space. |
| Ceiling-Mounted Bars | Attached to ceiling joists; ideal for maximizing space. | Great for high ceilings, allows for full range of motion. | Requires ceiling joists, permanent installation. |
| Free-Standing Pull-Up Stations | Independent structure; offers various exercises; requires more space. | Versatile, can perform multiple exercises. | Requires significant floor space, can be expensive. |
How Can a DIY Pull-Up Bar Be Constructed in an Unfinished Basement?
A DIY pull-up bar can be constructed in an unfinished basement using sturdy materials and proper installation techniques to ensure safety and functionality.
To create an effective DIY pull-up bar, follow these key steps:
-
Select the Location: Choose a suitable spot with enough vertical space. Ensure there is solid overhead support, such as beams or joists, to anchor the bar securely without risking structural integrity.
-
Gather Materials: Obtain necessary materials.
– Metal Pipe: Use a steel or galvanized pipe around 1 inch in diameter for the actual bar. It should be about 4-5 feet long, depending on available space.
– Mounting Brackets: Acquire heavy-duty wall-mounted brackets or vertical supports to hold the bar firmly.
– Screws and Anchors: Use appropriately sized screws and wall anchors for securing the brackets to the wall or beams. -
Prepare the Mounting Surface: Inspect the chosen location for decayed wood or any defects. Clean the surface and, if needed, reinforce it to support the weight.
-
Measure and Mark: Position the brackets by measuring the desired height for the bar. Mark the drilling points on the wall or beams to ensure correct alignment.
-
Install Brackets: Drill holes at the marked points. Insert wall anchors if necessary for added support. Then, securely attach the brackets using screws.
-
Attach the Bar: Fit the metal pipe into the mounted brackets. Ensure it is level and secure before proceeding to test it.
-
Test Stability: Carefully apply weight to the bar by using gradual pressure or an exercise band. Check for any wobbling or instability. Tighten or adjust as necessary.
Following these steps will help create a DIY pull-up bar that is safe and effective for workouts in an unfinished basement environment. Ensure to regularly check the stability and condition of the installation for continued safety.
Why Choose a Wall-Mounted Pull-Up Bar for an Unfinished Basement?
Choosing a wall-mounted pull-up bar for an unfinished basement provides a space-efficient and stable option for strength training. This type of exercise equipment securely attaches to the wall, saving floor space while offering robust support for various exercises.
The American Council on Exercise (ACE) defines a pull-up as a bodyweight exercise that primarily targets the upper body, particularly the latissimus dorsi muscles, biceps, and shoulders. This organization emphasizes the value of bodyweight exercises for building strength and enhancing fitness.
Several reasons make a wall-mounted pull-up bar suitable for unfinished basements. First, an unfinished basement typically has sturdy walls that can support a heavy load. Second, it allows for maximized vertical space since pull-ups require upward movement. Finally, wall-mounted bars are often fixed, providing stability and safety during workouts.
A wall-mounted pull-up bar requires specific conditions for installation. It must be attached to a wall stud, which is a vertical framing member in building construction. These studs provide the necessary support to bear the weight during exercises. It is important to locate the studs using a stud finder to ensure the bar is secure.
The mechanism of a wall-mounted pull-up bar involves a simple yet effective design. The bar itself is horizontal, with brackets connecting it to the wall. When a person hangs from the bar and pulls their body upward, the force generates tension on the brackets. Quality construction will ensure that this tension does not lead to damage or failure.
Specific actions that contribute to the effectiveness of a wall-mounted pull-up bar include proper installation and regular maintenance. Ensuring that the pull-up bar remains tightly secured to the wall is crucial. For example, checking screws and brackets periodically can prevent accidents and ensure longevity.
How Should You Install a Ceiling-Mounted Pull-Up Bar in an Unfinished Basement?
To install a ceiling-mounted pull-up bar in an unfinished basement, you will need to follow specific steps for safety and performance. This includes choosing the right location, securing to proper framing, and using suitable hardware.
Begin by selecting a location that has adequate height, ideally 7 to 8 feet from the floor. This height allows for sufficient clearance during exercise. Make sure that there are exposed ceiling joists or beams to anchor the bar securely.
Next, use a stud finder to locate the center of the joist where you will attach the bar. Typically, ceiling joists are spaced either 16 or 24 inches apart. The pull-up bar should be fastened to at least two joists for stability. Measuring the distance between the joists can help you avoid overloading a single point.
When attaching the pull-up bar, use strong mounting brackets specifically designed for pull-up bars. The installation usually requires lag screws or heavy-duty bolts. These fasteners can support a significant amount of weight, typically up to 300 pounds or more, depending on the bar’s specifications and load capacity.
For additional stability, consider adding drywall anchors if installing in locations without direct contact with the joists, though this is less common in unfinished basements. Providing a level indication with a bubble level ensures the bar is mounted accurately.
Additional factors include ensuring that the area around the pull-up bar is clear of obstacles. You should also consider the weight of the user, as the combined weight and any dynamic movement can introduce strain on the mounting points.
In summary, install the pull-up bar in a location that allows for ample height, secure it to the ceiling joists using appropriate hardware, and ensure the surrounding space is free of obstructions.
What Makes a Joist-Mounted Pull-Up Bar a Good Option for an Unfinished Basement?
A joist-mounted pull-up bar is a good option for an unfinished basement due to its space efficiency, ease of installation, and adaptability to various exercises.
- Space Efficiency
- Ease of Installation
- Versatility of Exercises
- Cost-Effectiveness
- Stability and Durability
The following points highlight the benefits of a joist-mounted pull-up bar in more detail.
-
Space Efficiency: A joist-mounted pull-up bar maximizes vertical space while minimizing the floor area required for workouts. Since basements often have limited space and a cluttered environment, this setup allows for more freedom of movement and easier navigation around the workout area.
-
Ease of Installation: Installing a joist-mounted pull-up bar is generally straightforward. It requires basic tools, such as a drill, and can be completed with minimal technical knowledge. Most pull-up bars come with detailed instruction manuals and installation kits, making them accessible for DIY enthusiasts.
-
Versatility of Exercises: The joist-mounted design permits various exercise options beyond standard pull-ups. Users can perform chin-ups, leg raises, and even attach resistance bands for more diverse workouts. This adaptability appeals to different fitness levels and workout styles.
-
Cost-Effectiveness: Joist-mounted pull-up bars typically come at a lower price point than free-standing models or gym memberships. Many options are available below $100, making them budget-friendly for individuals setting up a home gym in an unfinished basement.
-
Stability and Durability: A properly installed joist-mounted pull-up bar anchors securely to the ceiling joists. This solidity provides a stable and safe workout platform. Many high-quality bars can withstand substantial weight and rigorous use, making them a reliable choice for committed fitness enthusiasts.
What Factors Are Important to Consider for Safety When Choosing a Pull-Up Bar for an Unfinished Basement?
When choosing a pull-up bar for an unfinished basement, consider factors like stability, weight limit, installation method, and space requirements.
- Stability
- Weight Limit
- Installation Method
- Space Requirements
- Material Durability
- Grip Comfort
- Ceiling Height
Stability: Stability in a pull-up bar refers to its ability to remain securely mounted during use. A stable bar reduces the risk of accidents and injuries. Factors affecting stability include the mounting system, wall strength, and the type of bar (freestanding versus mounted). A study by the American Journal of Sports Medicine emphasizes that unstable setups can lead to falls or equipment failure.
Weight Limit: The weight limit indicates the maximum weight the bar can safely support. Exceeding this limit may cause structural failure. Many bars can support anywhere from 250 to 500 pounds. Consumers should consider their body weight plus any additional weights used during workouts. According to an analysis by FitRated, users should always choose a bar that exceeds their total weight by at least 25%.
Installation Method: Installation method involves how the bar is set up in the space. Options include wall-mounted, doorway, and freestanding designs. Wall-mounted bars often provide greater stability. However, they require secure wall structures and can be challenging in unfinished basements. A review in the Journal of Strength and Conditioning Research recommends considering ease of installation to ensure safety and proper setup.
Space Requirements: Space requirements define the area needed to safely use the pull-up bar. Ensure there is adequate height and width to perform exercises without obstruction. Regulatory standards suggest maintaining a minimum clearance of 8 feet for overhead exercises. Not accounting for space can lead to risks of collision with surrounding objects. A 2019 study in the International Journal of Sports Science outlines the importance of spatial safety in workout environments.
Material Durability: Material durability pertains to the strength and lifespan of the pull-up bar materials, such as steel or reinforced aluminum. Durable materials are less likely to bend or break during use. According to a report by Consumer Reports, choosing bars constructed from high-grade steel can enhance long-term safety.
Grip Comfort: Grip comfort considers how the bar feels in hand during exercises. A comfortable grip reduces slip and improves performance. Some bars come with padded grips or specific shapes to enhance comfort. A survey conducted by Fitness Insider indicated that users prefer grips that provide a solid feel while being easy on the hands.
Ceiling Height: Ceiling height is critical since pull-ups require ample overhead clearance. Ensure the bar can fit without needing modifications to the ceiling. Most pull-up bars require a minimum height of 7 to 8 feet. Adjusting heights post-installation can compromise safety. The National Strength and Conditioning Association advises ensuring a clear overhead space when selecting equipment for physical activities in any indoor setting.
How Can You Ensure Proper Installation of a Pull-Up Bar in Your Unfinished Basement?
To ensure proper installation of a pull-up bar in your unfinished basement, focus on selecting the right location, using appropriate tools, and securing reliable support structures.
-
Selecting the right location:
– Choose an area with sufficient overhead clearance to allow for full range of motion. Aim for at least 7 to 8 feet of vertical space above the bar.
– Ensure that the wall or ceiling where you install the bar has enough space around it for comfortable movement and to avoid collision with nearby objects. -
Using appropriate tools:
– Gather tools such as a drill, stud finder, level, and socket wrench. A drill will make holes for mounting, and a stud finder will locate the strongest support structures in the wall.
– Confirm that you have a pull-up bar designed for wall or ceiling installation, as these types are more secure and reliable. -
Securing reliable support structures:
– Identify and mark the location of wall studs or ceiling joists using a stud finder. Studs typically run vertically in walls, and it’s essential to anchor your bar to these for safety.
– Use lag screws to attach the pull-up bar securely into the studs. Lag screws provide a stronger hold than regular screws and can support more weight. -
Checking for stability:
– After installation, test the bar by applying gradual pressure to ensure it can bear your weight without wobbling or shifting.
– Regularly inspect the installation for any signs of wear or loosening, which could indicate a need for maintenance or repositioning. -
Safety precautions:
– Make sure to use safety gear, such as a spotter or extra mats underneath, during initial attempts.
– Avoid extreme swings or fast movements until you are confident in the bar’s stability and your own proficiency.
By focusing on these steps, you can install a pull-up bar in your unfinished basement safely and effectively.
Related Post: